Disc brakes have long been the preferred brake design for modern mountain bikes, they’re gaining popularity for cyclocross, and they’re finally available on road bikes. The braking force is applied to a disc that is bolted directly to the hub. They provide more stopping power, and better performance in bad weather than traditional rim brakes We’re going to take a look at adjusting mechanical disc brakes, so you can get the best performance possible.
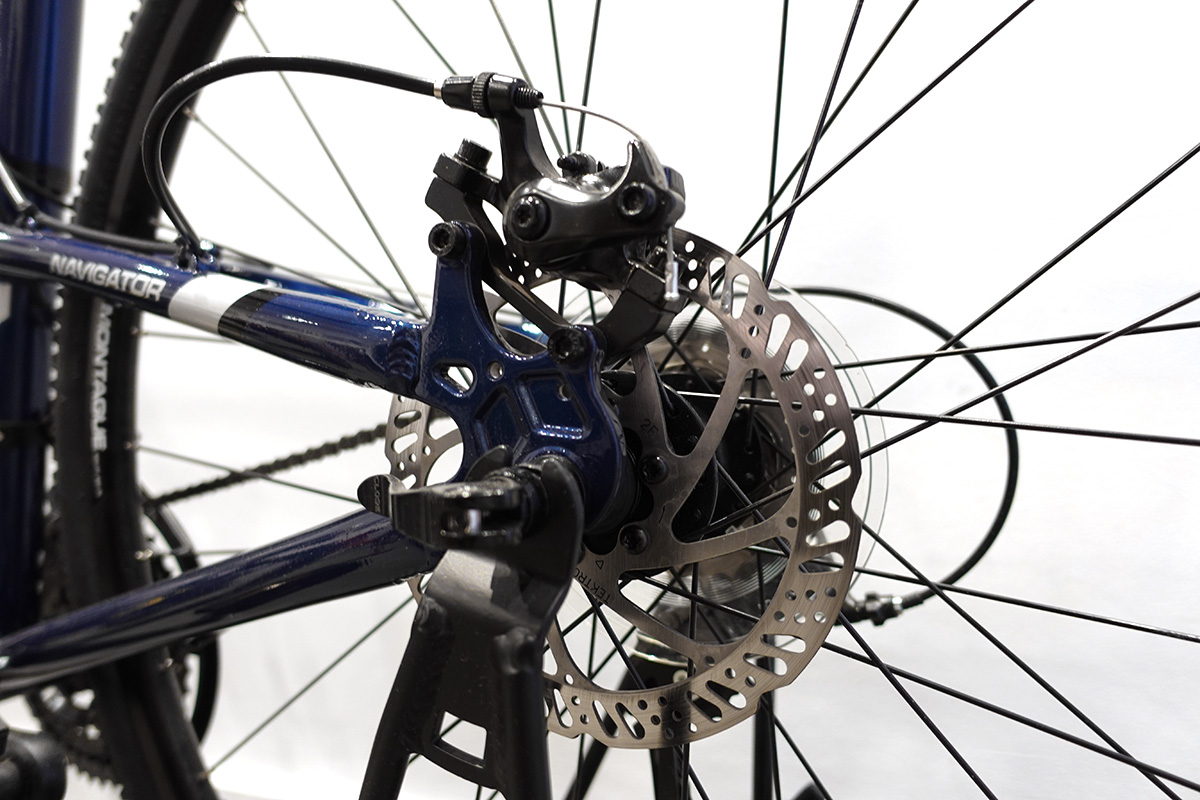
I’m working on Tektro Aries brakes, which come standard on the Montague Navigator, but the process for adjustment will be similar for other models. Most mechanical disc brakes have one pad that stays stationary (the inside one), and one pad that moves (the outside one) in order to apply pressure to the rotor. The rotor actually flexes toward the stationary pad so it’s squeezed between the two.
The first thing to set when adjusting your disc brakes, is the position of the caliper itself. There are two bolts that hold the caliper on the mounting bracket. By loosening them, you can move the caliper slightly from side to side.
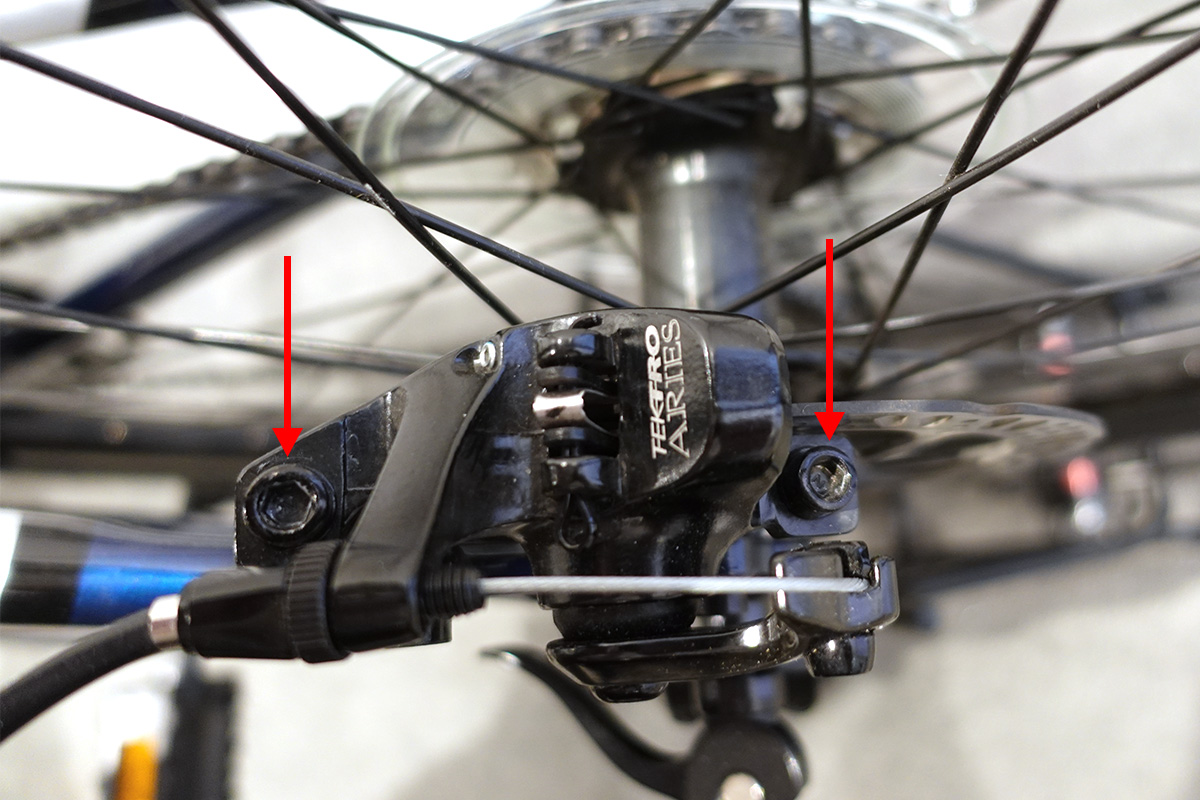
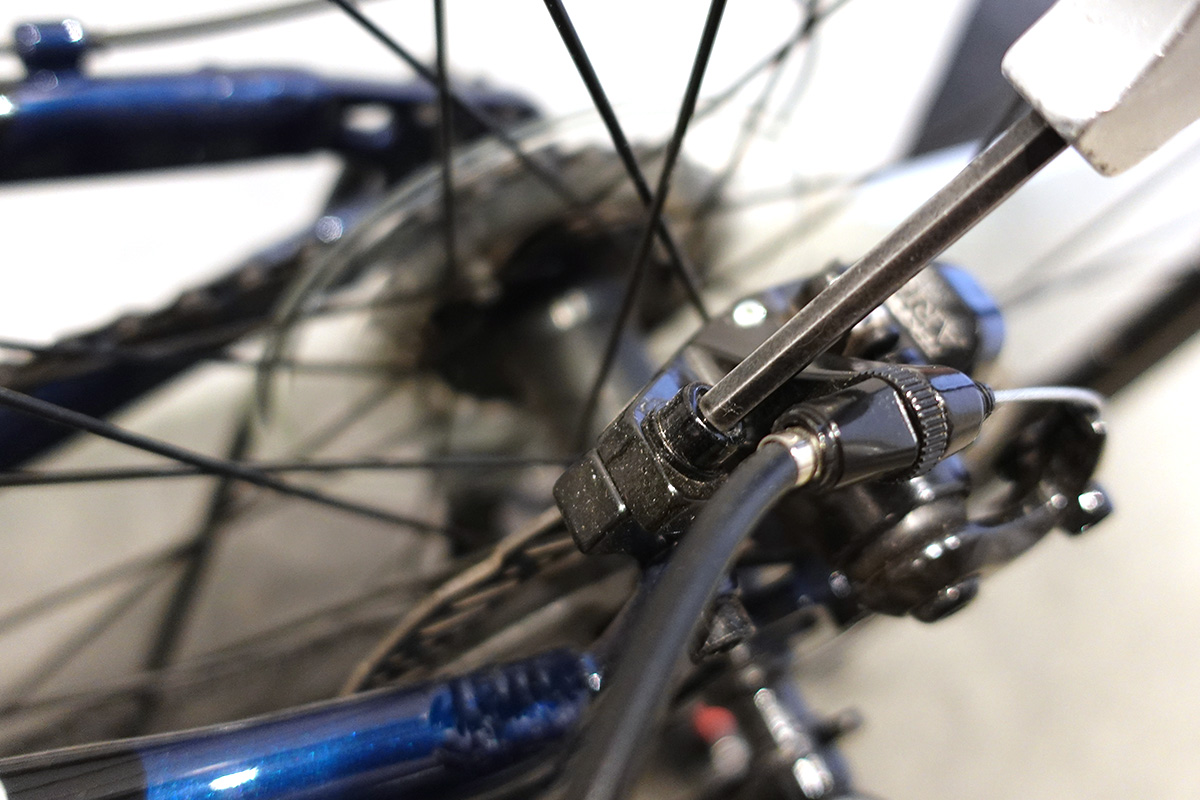
With the brake arm in the rested position (ie. no tension on the cable), you want to position the caliper so the moving pad (outside), is just about as close to the caliper as possible, without rubbing. Then re-tighten those caliper mounting bolts, alternating until they are both tight. Spin the wheel to make sure there is no rubbing on any point on the rotor (sometimes the rotor can be slightly out of true).
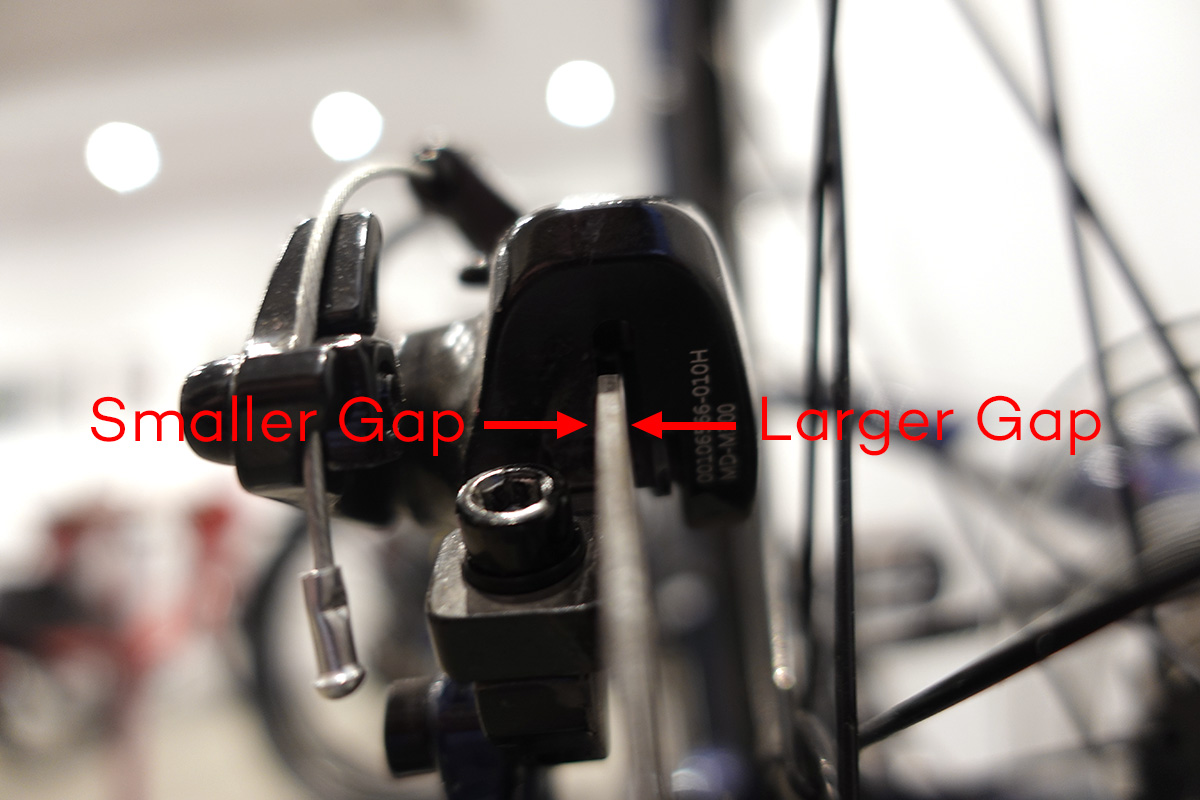
Next, you want to set the position of the inside stationary pad. On the back side of the rotor, there is a nut that can be turned to move the pad in or out. Turning it clockwise will move it toward the rotor, counter-clockwise will move it away. You actually want this pad to be a bit farther away from the rotor than the moving pad. A ratio of 2:1 is a good place to start, making the stationary pad gap twice as wide as the moving pad gap.
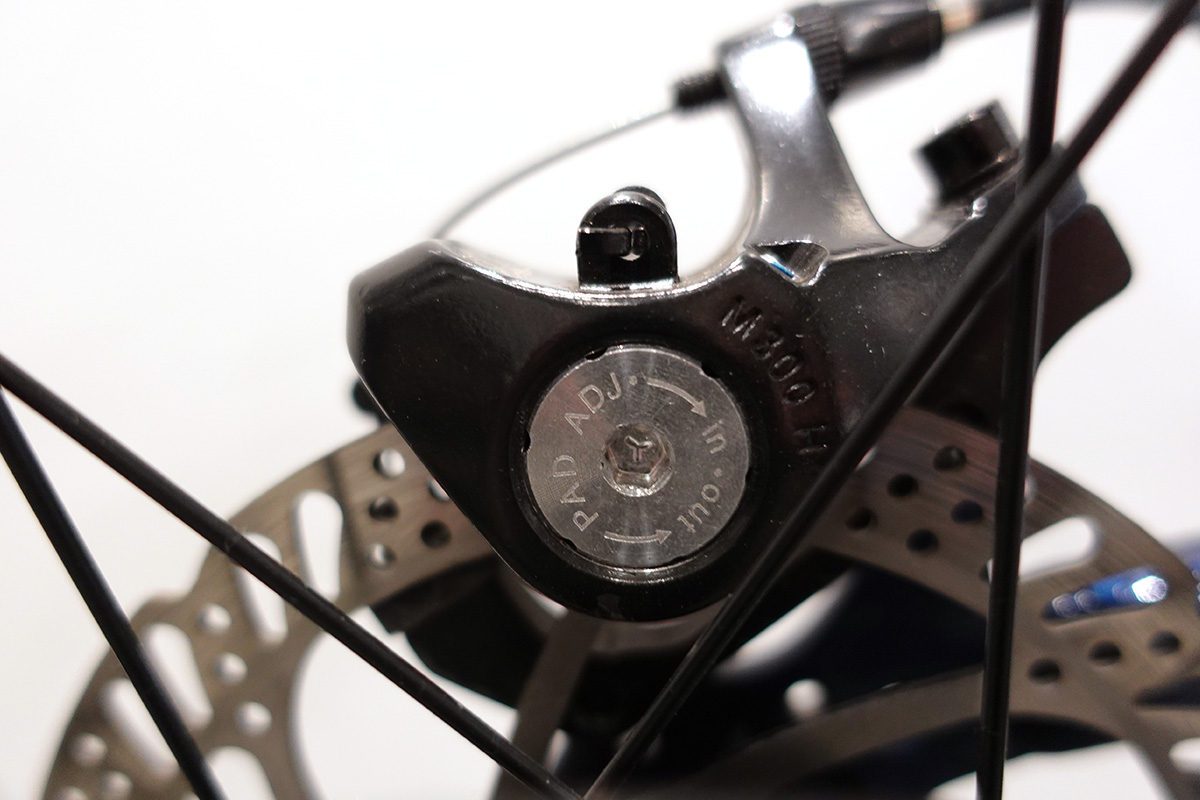
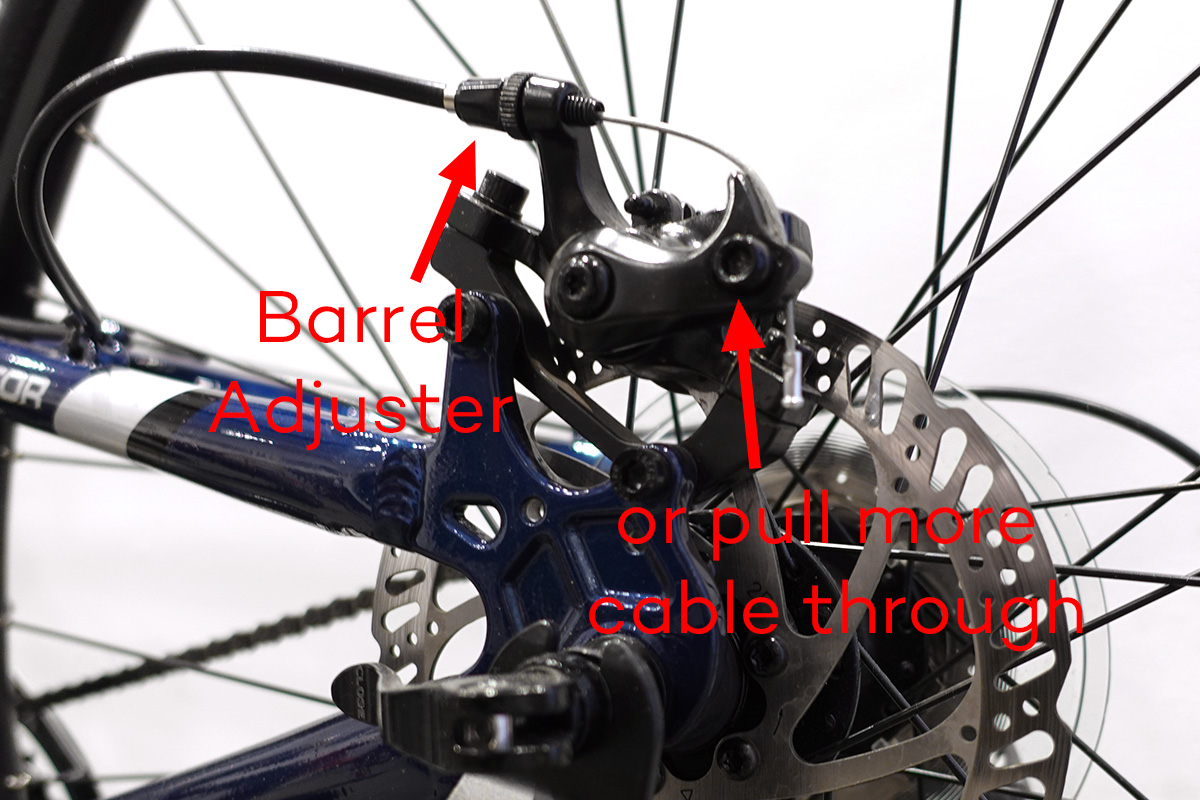
Squeeze the brake lever to test the caliper. The brake should fully engage before the lever is pulled back to the handlebar. If you’re able to pull the lever all the way to the handlebar, or they feel too soft, move the stationary pad even closer to the rotor. If you were unable to get the moving pad as close to the rotor as you’d like by simply positioning the caliper, you can move that one in by turning the barrel adjuster counter clockwise. This will put more tension on the brake cable. In extreme situations, you can even loosen the cable pinch bolt, and pull more cable through. This will actually cause the brake arm to be slightly engaged in the rested position (however this isn’t usually recommended by brake manufacturers).
As you ride, brake pads do wear and become thinner. When braking power decreases, adjust the pads closer to the rotor. Be sure to keep on eye on them and replace when necessary. If you’re ever unsure about your work, have it checked by a professional bike mechanic. Happy riding!


Wonderful blog with specific instructions and images that is easy to understand. Just perfect too because my disc brakes aren’t that tight anymore. It doesn’t hold as much as before. Thanks for sharing this. You certainly made it look easy.
Wonderful blog. You made the tutorial so easy to understand because of the appropriate images. I’m about to buy a bike and it is always best to know stuff. So here I am thanking you for such an informative blog. Please keep posting for more stuff about biking.
Very helpful and every sentence in this article is to the point. Thank you for helping me fix a loose brake – the same ones as shown in the pictures.
good technical data!
thanks a lot. these are very easy on the eye. my rear brake is loosening when I go rumbling, and fall. thanks! but do these instruction apply at front brake?
Thanks for the clear directions and photos! Really made the process easy for a new-to-disco 🙂
Excellent article! Thanks very much.
Finally a very easy explanation and even better those are the same brakes i have on my 29er, two guys at work (calling themselves “PRO’S ) just messed up more the breaking performance, now i fixed my self in less than t min.?
Thank you! You just saved me $100+ because I was about to take my bike into the bike shop. Adjusted the two bolts and moved it a tiny bit and boom, fixed.
Thanks again!
Thanks a lot, very useful and clear description.
did you ever had issue with squishy long-pull brake issue?
my rear brake cable goes directly from lever (brifter) to the caliper with no stopper or barrel adjuster in the middle.
is there any solution for this?
Thanks
Having stops on the frame helps with this. The cable housing itself can compress so if it runs the entire length the brakes can feel “squishy”.
Excellent blog with instructions and all images that is easy to understand. Thanks
Thanks for unselfishly sharing your knowledge.
Thank you for writing this. I was able too adjust by brakes in 10 min after reading your blog!
Thanks for the great tutorial. One point of note: I have a 2016 Navigator. The brakes seem to be Promax 300. There is what I believe to be a tiny set screw holding the stationary (inside?) pad adjustment in place. It’s probably very important to loosen this screw before adjusting the inside pad and re-tightening it when you’re done.
Hi Tom. On that brake there is indeed a set screw to lock the stationary pad in place. When this post was written we weren’t using any brakes with that on our bikes. Thanks for the reminder, we’ll update the post!
My rear brake caliper seems to experience an automatic tension cut out on the rear brake caliper when the cable tension has been applied for a while.
I have never experienced this before on any of my mountain bikes and I am puzzled as to what the problem is. It’s definitely tension related as one can almost feel when it’s going to click out and give way to a total pressure release.
Any suggestions. It’s new pads and a rear caliper and I can’t seem to get the braking system set up for steep down hill rides.
I don’t believe we’ve ever heard of this before either. What model brake caliper is it? What bike is it on?
Sounds like your caliper may be bottoming out on itself because you’ve pulled too much cable through the brake arm, probably because your brake pads are overly worn, replace brake pads, leave as much slack as possible on the brake arm so it doesn’t bottom out and do any micro adjustments on the barrel adjuster
Many thanks. Saved a trip to Halfords!
Great tutorial. Thanks for that! Any suggestion for how to fix a front brake that does not release once hand brake is squeezed? Do I have a brake fluid issue? If so, any suggestion on how to adjust? Currently only using the back brake due to this issue and loath to pay for what may be a simple fix.
I would like to thank you! I fiddled around for hours and couldn’t get it right and your instructions had it all fixed in a few moments! Kind wishes Simon, Sydney Australia
More than delighted to see a website that has articles that are to the point and easily understandable with all technical data put forth in an understandable manner.
I have this article saved on my homescreen for easy access whenever i need it
Kudos!
Great little tutorial ! Instant success when I thought it was a hub issue or I would have contact a bike mechanic and pay ! Thank you.
Thanks! This article saved me a trip to a mechanic and got me stopping(safely) in no time.
Very precise and well illustrated. Happy stopping ?
thank you 🙂 very well explained
My issue is the opposite of loose brakes. It seems over time that the brakes seize up and tighten, so the wheel won’t even turn. Is that normal? Do you adjust the same way – or is this a different issue?
Thanks.
If they’re mechanical disc brakes and are too tight, you could adjust the cable tension in a similar way. However, it’s quite strange that they would get tighter over time. If they’re hydraulic disc brakes they could get tighter and the pads/pistons would need to be pried apart, but that’s not the case with mechanical. Perhaps the mounting bolts are not tight enough and the whole caliper is shifting so that it rubs the rotor?
My rear disk brake is so loose near the lever(front) that pulling it doesn’t even move the calipers that grab the disk. How do I tighten it near the other end?
If the brake cable is too loose to use the methods above for adjustment, you’ll need to loosen the bolt that clamps the cable to the caliper, and pull it tight. Using a pair of pliers to grab the cable is the easiest way to get significant force on it. After the cable clamp is re-tightened, you can use the barrel adjuster on the lever (or caliper if it has one) to fine tune the tension.
Thank you, been having problem for a while followed these easy instructions,problem sorted. Much appreciated.
All the general info that I have found on adjusting disk brakes, say to have the stationary pad as close to the rotor as possible without rubbing. You are saying the opposite. Is this unique to the Tektro Novela setup to have the moving pad closer to the rotor? Thanks
Hi Brad. Brake manufacturers vary in their guidance on this. Our guidelines are based on those from Park Tool. The reality is that both pads should actually be as close to the rotor as possible in order to get the best braking power.
Hello. I have a problem of the rotor being too close to the moving pad. When I loosen the caliper hold down bolts there seems as if the slots in the caliper don’t give me anymore adjustability to move the moving pad away from the rotor. I feel like widening the slots to give me more adjustability. This is a new bike and and my son said it occurred on the second use of the bike. We had the bike for a year or so but had not assembled it or used it. Please help me with some ideas.
What is the torque specification for the caliper mounting bolts? Same front and rear?
Very good instructions. Extremely helpful.
Really useful. Had my bike robbed so had to get a cheaper one for work from Halfords. Came with a rubbing front disc that honestly sent me insane. Just fixed it with a few minutes of playing around and it’s calmed my mind. Nearly broke two fingers in the process but at least I can ride my bike uphill now.
Hello, my Paratrooper rear Promax mechanical brake caliper inside spring is broken, do you know the model number of those spring?
Aside from pads, I’ve never seen Promax brake parts sold individually. You will likely need to replace the caliper.
Just spent ages looking for a guide I could follow and yours is t H e first one that’s actually shown me what to do in an easy to understand format. Thank you.
_Great_. Thank you!
Fantastic explanation, it helped me fixing my brakes…. thanks !
Hi I bought a second hand montague TX swiss bike 2009 model .Will need to replace the front brake pads where can I get replacement pads in the UK and what are these pads called/manufacturer/part number.
Regards Jim
There are few different brake caliper models that could be on that bike depending on the production, but they’re most likely Promax. If that’s the case, it should say Promax right on the brake, and they likely use Promax PD065 replacement pads. Take a look at the existing pads and confirm they’re the same shape as the PD065 before you order. If you’re having trouble finding a match, a replacement brake caliper would not be too expensive and should work with the existing brake lever.
Knowing how to fix bike brake cables will help you prevent any form of accident and ensure a smooth and enjoyable biking experience. The first thing that you should do is inspect whether your inner cable is clean or building up dirt. If cleaning and lubricating your bike brake cable did not resolve the problem, you may consider replacing bicycle brake cables by following these steps: removing a frayed or bent bike brake cable to prepare for bicycle brake cable repair and replacement, sliding the cable out from the brake lever, cutting and inserting the new cable into the cable housing. Secure the cable to the casing by sliding the caps at the edges of the cable housing into their proper position.
One of the most common problems that you can face with brakes is broken and bent bike cables. It means your brake may not deliver well, which causes you to lose control while riding. Good thing, you can learn how to fix bike brakes cable. Simple ways include proper cleaning and lubricating of the cables, replacing them successfully, and testing for biking.
Learning how to adjust bike brakes rubbing can lower your risk of biking-related accidents. You will feel safer every time you go biking!!. First, you should check the brake pads: If the brake pads have a smooth surface, you must replace them immediately. Then, assess the brake pads’ grip on the rim. Adjust the brake pads until they are at the center of the rim, it should address your issue of bicycle front brake rubbing or rear brake rubbing. Turn the barrel adjuster to the right to increase the brake cable tension. Do the opposite if your brake cable feels too tight. Pull the brake cable outward and hold it in place using your free hand. This maneuver will tighten the caliper and brake pads against the bike’s rim. Testing the brake system is the last step to adjust brakes on a bike.
You only need a few things to adjust your bicycle’s brakes to address the rubbing issue: an appropriate wrench and knowledge of your bike’s brake system.
Wow out of all the superficial no substance article floating around the internet, this was straightforward with useful pictures. Great one. My 200$ Fatbike came filled with no adjustments done. Even the rear rotor wasn’t even. Made a lot of screeching. I managed to tone it down to almost null thanks to this post.
1. As the brake pads wear, should the user both 1) dial in the stationary (inside) pad to move it closer to the rotor, and 2) screw out the barrel adjuster to tighten the cable as well?
2. Apparently, some mechanical disk brakes have two pistons: Are the original + wear adjustment procedures the same (dial + barrel adjuster)?
You could adjust both the stationary and the barrel adjuster as the pads wear. I typically find myself using the barrel adjuster when I notice it’s necessary, but for the best brake response you want the stationary pad as close to the rotor as possible. So it’s a good idea to check that as the pads wear and adjust accordingly.